Understanding Flutter Constraints Rule 1 : Constraints Go Down
Working with a complex UI deep within a widget tree often leads to numerous layout errors. It happens due to a lack of understanding of Flutter's constraint rules. This blog addresses the first rule.

When we start learning Flutter from simple layout examples, everything works as expected. The widgets are aligned and sized properly. However, as soon as we have a more complex UI deep within the widget tree, we begin to see numerous layout errors and issues.
We may find temporary solutions on Stack Overflow, but deep down, we know that something is missing – something about the layout constraint system that we don't understand.
Flutter constraints system follows three simple rules:
Constraints go down.
Sizes go up.
Parent sets position.
We’ll go deep into each of these rules in this three-part article series, explaining each rule with examples, common errors, and their solutions.
Let's begin this article with our first rule: Constraints go down.
What Are Constraints?
Constraints are limitations or restrictions imposed upon you by someone higher up in your hierarchy.
For example:
A company sets the working hours of an employee from 9 am to 5 pm.
Parents allow their kids to play outside for 2 hours, specifically from 9 am to 11 am.
In the above example, the bold text represents the constraints.
Similarly, every widget in Flutter is rendered based on the constraints imposed upon them by their parent widget in the widget tree. A widget can be visualized as a box, and the size of this box on the screen is determined by an object called BoxConstraints for each widget.
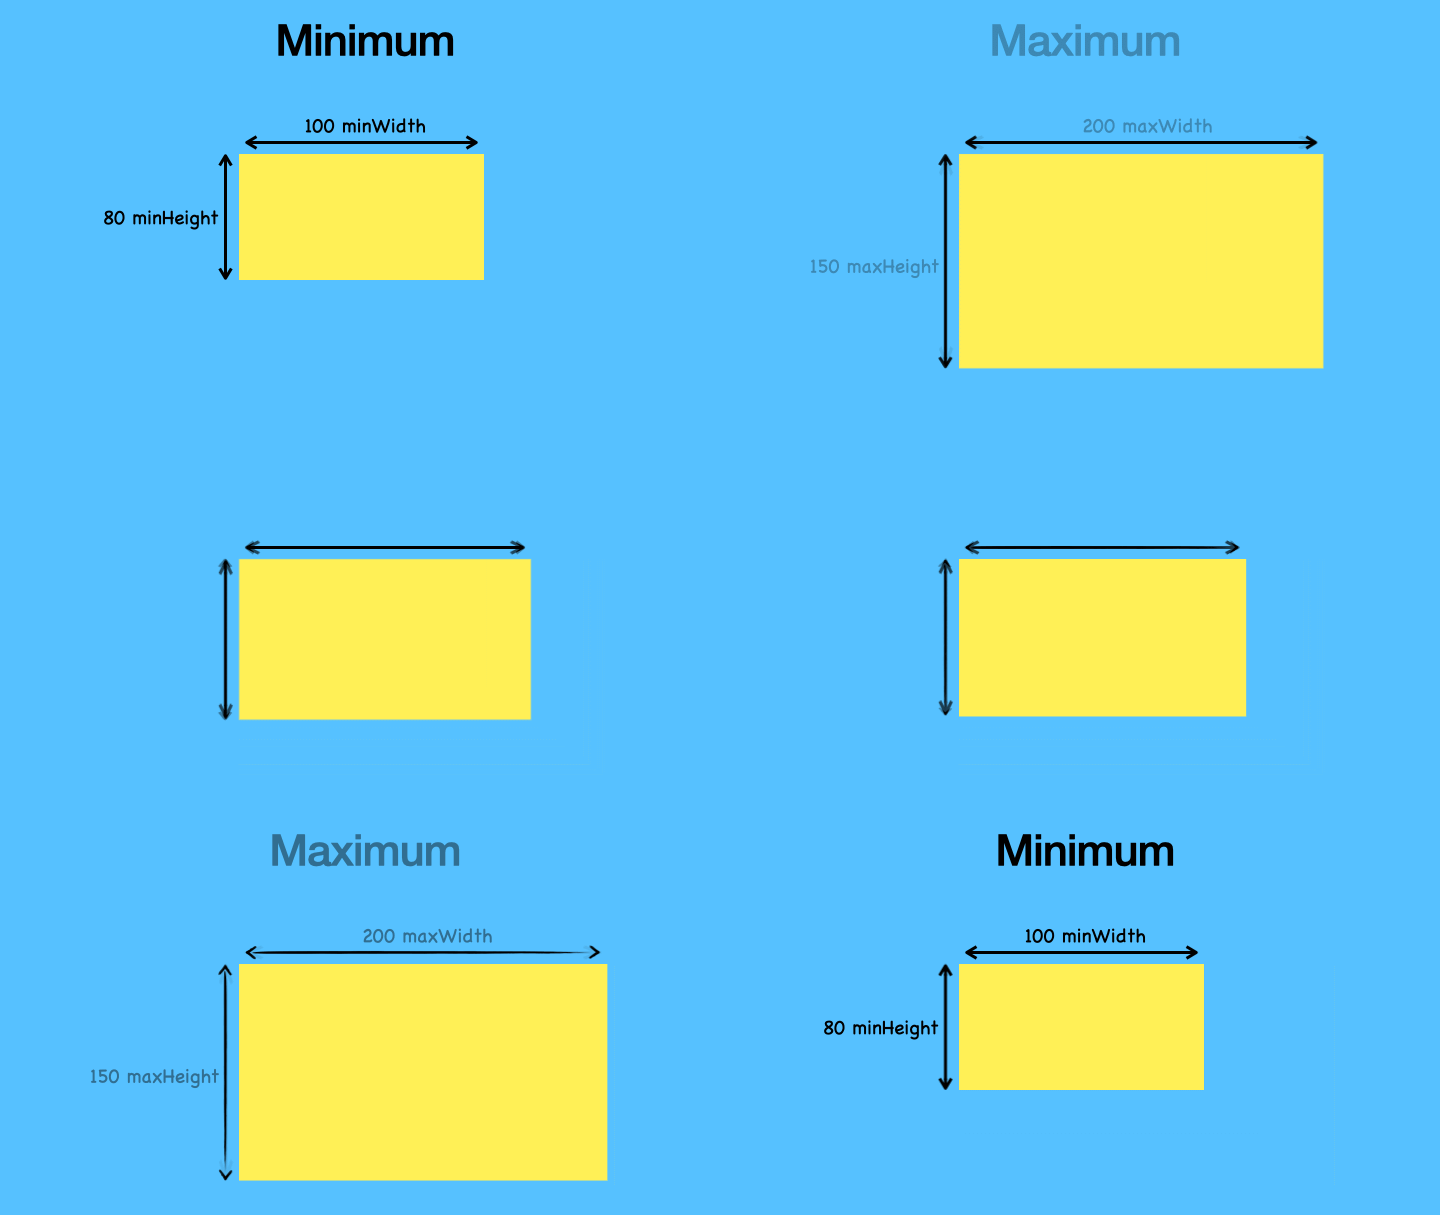
BoxConstraints is an object that consists of four values: minWidth, maxWidth, minHeight, and maxHeight. The below gif demonstrates a Yellow Box that adjusts its size within the minimum and maximum limits specified by the BoxConstraints object.
Enough theory….
Let’s Write Some Code.
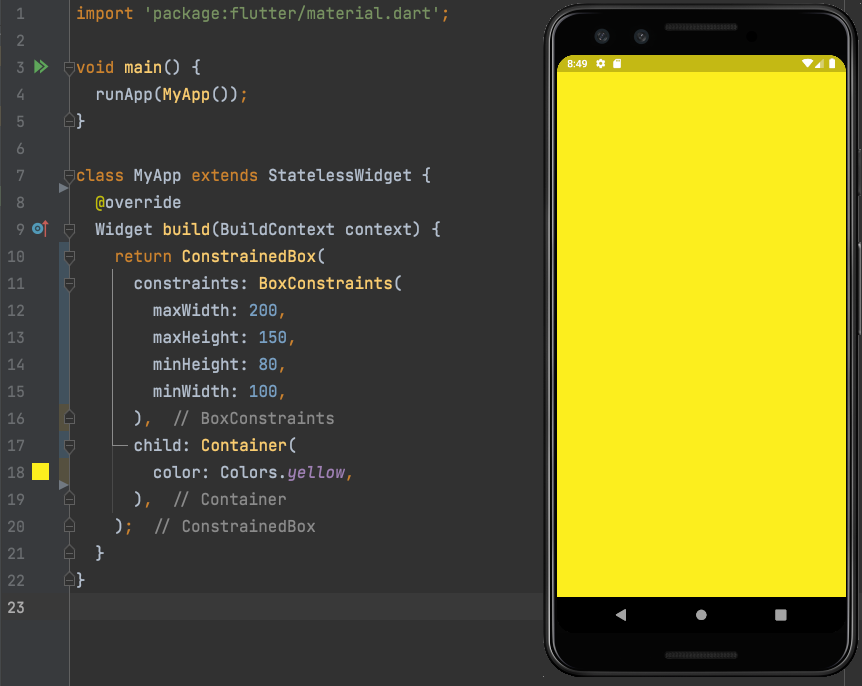
Let’s create the above yellow box using a Container that is wrapped inside ConstrainedBox which defines the maximum and minimum size of the Container using BoxConstraints object.
Note: We can use the constraints parameter in Container itself. But to showcase the parent-child relationship for the sake of this example we are wrapping inside ConstrainedBox
Let's create the above Yellow Box using a Container that is wrapped inside a ConstrainedBox, which defines the maximum and minimum size of the Container using the BoxConstraints object.
Note: We can use the constraints parameter directly in the Container itself. However, for the purpose of this example, we are wrapping it inside a ConstrainedBox to showcase the parent-child constraint relationship.
Hmmm... This is not what we expected.
The size of the yellow box should be in the constraints of 200 and 150 provided by the ConstrainedBox, but instead, it is taking up the entire screen.
What’s happening here?
Typically, the first thing we do is a Google search for "Why Container's BoxConstrains not working as expected?"
The top answer often suggests a solution like, "Wrap this widget with Center."
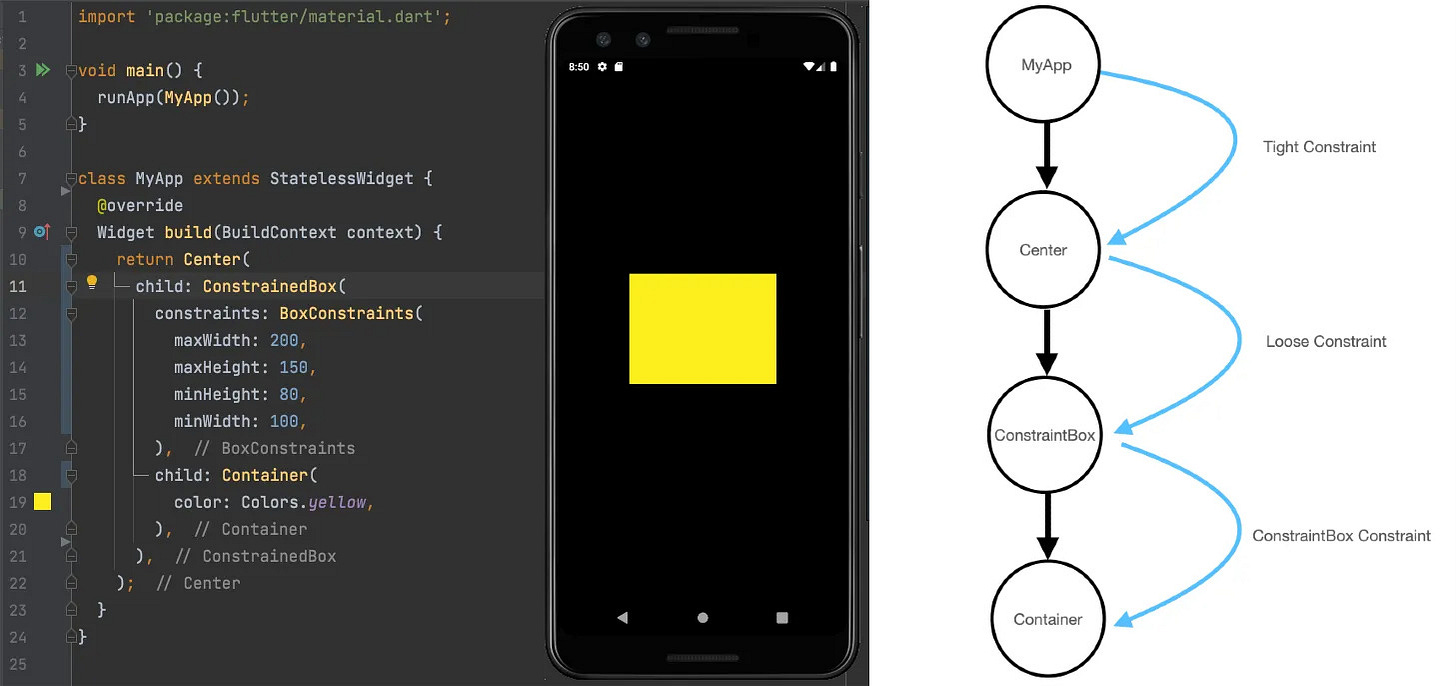
So, let’s make that change at line 10.
And boom! It is now working as expected.
Now, the question is: Why?
Beginner developers often don't bother to ask this question and simply move on. However, sooner or later, we may find ourselves falling into this trap again.
Therefore, before we explain the solution, let's first try to understand...
What Does the Rule “Constraint Go Down” Mean?
The Flutter UI is based on a render tree that has a parent-child relationship between widgets. The root widget is the parent and can have children, and those children become parents if they also have children.
In our case, the tree looks like this:
Now, the constraint rule states that only the parent widget can pass constraints to its child, not the other way around.
Based on that, a child widget can determine its size within the given constraints set by its parent (more on this in part 2).
Therefore, from a tree perspective, the constraint always travels downwards and never upwards.
Types of box constraints
To understand the above Center solution, we need to understand the types of box constraints that are passed between widgets in the tree.
There are three types: tight, loose, and unbounded box constraints
Let's understand these by taking a real-world example from a different kind of parenting.
1. Authoritative parenting → Tight constraints
Authoritative parents are very strict. They have already decided on a career for their children regardless of the children's personal interests. Most children don't have any options and are forced to pursue a career that their parents want.
In Flutter, this parent-child widget relationship is called tight constraints, where a parent widget passes tight constraints to its child widget, and the child widget is forced to take size based on the parent's constraints while ignoring its own size.
In code, we refer to it as tight constraints when we set minWidth == maxWidth and minHeight == maxHeight. We can use the BoxConstraints.tight() constructor for this by passing a Size object as a parameter.
2. Permissive parenting → Loose constraints
Permissive parents are very lenient and supportive. Instead of forcing a child to pursue one career, they come up with a list of different careers. The child has the freedom to choose a career from the given list. However, they cannot choose a career outside the given list.
In Flutter, this parent-child widget relationship is called loose constraints, where a parent widget passes a range of sizes to the child widget.
The child has the option to choose a size from that range. It can be big or small within the given range. (To learn more about how a child chooses its size, wait for the second part of this article.)
In code, we call it a loose constraint when we set minWidth = 0 and minHeight = 0. We can use the BoxConstraints.loose() constructor for this by passing a Size object as a parameter.
3. Uninvolved parenting → Unbounded constraints
Uninvolved parents generally stay out of the way of their child's choices. They do not have any say in the child's career choice, which gives the child full freedom to choose a career based on their interests. Sometimes, this can lead to a wrong career choice if there is no proper guidance, so we need to be careful about this.
In Flutter, this parent-child widget relationship is called unbound constraints, where a parent widget passes an unbound size (no restriction on the size) to the child widget. The child widget can choose any size, even beyond its parent's constraints, which can sometimes result in an overflow pixels error on the UI. Therefore, we need to be cautious when using unbounded constraints.
In code, we refer to it as an unbounded constraint when we set any of the size values to double.infinity. We can use the BoxConstraints.expand() constructor for this.
An unbound constraint can be specific to one direction as well. For example, if we have a fixed height but the width is set to double.infinity, we call it an unbounded width. The same concept applies to height.
An unbounded constraint can also be a tight or loose constraint at the same time if you set the minWidth to double.infinity or zero, respectively.
Going back to the problem
So, can you guess by now what's wrong with the first example?
The reason is that the Flutter framework is passing a tight constraint to MyApp(), and then MyApp() is passing that tight constraint to ConstrainedBox, which forces ConstrainedBox to ignore its own constraint and be forced to use its parent's constraint, i.e., the full-screen size. As a result, we see yellow on the full screen.
Now, the next question would be:
How does the Center solve this problem?
In the above example, we saw three types of parenting. However, in the real world, there are some outlier children who:
Pursue a career in what they are interested in, regardless of their parent’s interests, and give their own child the same choice.
Give their child more options than what their parents gave them.
Or for worse, they enjoy the freedom of their own choice but force their child to pursue a specific thing.
In this case, the Center is that outlier child who takes a tight constraint from MyApp() and converts it into a loose constraint for its child, ConstrainedBox. Therefore, the Container follows the constraints given by ConstrainedBox.
If you want to learn more about how the widget sets the size, as Container does, or how the widget sets the alignment, as Center does then subscribe and wait for the upcoming article in this series.
Common Widget Constraint Problems and Solutions
Error: BoxConstraints forces an infinite width and infinite height.
This error occurs when the parent widget imposes unbounded constraints, such as a height or width of double.infinity, and its child widget tries to expand to match that infinite size, resulting in the above popular error.
We can demonstrate this error by wrapping a Container in an UnconstrainedBox and then setting the Container's height or width to double.infinity, or by usingBoxConstraints.expand().
Because Flutter cannot render infinite sizes. Either the parent or the child has to set a bound size so that the framework knows the size it needs to render. To solve this problem we can use widgets that have bound constraints. For example, LimitedBox has bound constraints.
Conclusion
A widget gets its own constraints from its parent. A constraint is just a set of 4 doubles: a minimum and maximum width, and a minimum and maximum height.
Then the widget goes through its own list of children. One by one, the widget tells its children what their constraints are (which can be different for each child),
In Flutter, all widgets like Scaffold, Row, Column, Expanded, and Flexible widgets render themselves based on the box constraint either set by their parents or by themself.
Due to this rule, we have some limitations on widgets:
A widget can decide its own size only within the constraints given to it by its parent. This means a widget usually can’t have any size it wants.
If a child wants a different size from its parent and the parent doesn’t have enough information to align it, then the child’s size might be ignored. Be specific when defining alignment.
That’s it for the first rule folks!! If you have any questions please let me know in the comments and subscribe to stay tuned for the remaining part of the series.
Thank you!!
Resources and Credits
From the official Flutter doc check out Understanding constraints.


Nice article
Amazing article Buhran. Thank you for writing.